The Badge-A-Minit Button Maker

badgeaminit2

Badges (also called buttons) are a great and inexpensive way to reward students or to sell for a fundraiser.  There are two sizes and each comes in Pin back or Magnet back for the same price:

Standard 2-1/4” badges are 50¢ each.

Large 3” badges are 65¢ each.

badgeaminitClick on these PDF links for badge templates: Small 2-1:4″ badges -OR- Large 3″ badges

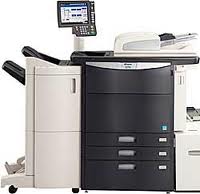
Badge making is simple and quick – it takes less than a minute to make one. The Graphics Lab has 3 badge makers and 2 circle cutters to make Standard 2-1/4” badges and Large 3” badges. There is also a paper template for both sizes (see above) – so you can plan ahead for your club design OR have students color & decorate the right size personalized design. Full color originals can be run off on the color copier for 15 cents per sheet, which is only an additional 2.5 cents to 4 cents per badge!

The strong magnets stick to lockers & refrigerators and aren’t considered dangerous for younger children.  Make either style button for Mother’s Day/Father’s Day presents, for birthdays, for field trips, for clubs, and as a trade item in team competitions. The Graphics Lab has also loaned out the standard badge maker to Dearborn elementary schools for the students to make buttons during Literacy Night.

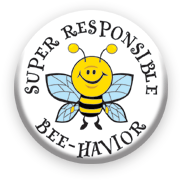
Stop by the Graphics Lab anytime to make a few badges . . . or to be inspired by the badge examples!

What is a #2 pencil?

The number on a pencil indicates the amount of hardness or softness the writing core has.

A #1 pencil is very soft, makes a dark mark, and tends to smudge.

A #3 or #4 pencil is very hard, makes a light mark, and tends to “dent” the paper.

The #2 grade pencil makes a nice dark mark that is easy to see (or scan . . . for tests), is easy to erase, and doesn’t smudge.

Incidentally, pencils do not have lead in them. The writing core is made from graphite and clay. More graphite and less clay makes a darker mark – more clay and less graphite makes a lighter mark.

Oh, and the little metal band that holds the eraser on the pencil is called a ferrule, a combination of the Latin words ferrum (“iron”) and viriola (“small bracelet”).

yellow pencil 2

The Graphics Lab has pencils, pens, and markers available for your use – no need to bring writing utensils!

Copy Paper Care

boise paperThere is an art to caring for the paper that goes into copy machines. Paper needs to be stored in the wrapper AND in the paper box for as long as possible.  Leaving paper sitting around unwrapped or unboxed causes it to absorb moisture very quickly – resulting in jamming throughout the copy machine.  Always store paper flat, NEVER store a ream of paper on its side or it will have a permanent curl!!

Most people don’t realize that sheets of copy paper actually have a top and a bottom.  Place the ream of paper on a table with the seam side of the wrapper facing up and unwrap the paper. Now, keeping the seam side of the paper stack face up, put the paper into the copier paper drawer.  This especially makes a difference when copying 2-sided material – by loading the paper with the correct side up, you will avoid jamming the copier.

If you are having a lot of copier jams, try flipping the paper over OR try replacing the paper with fresh paper . . . before you call the copier repairman!


Can I Drop Off Copy Jobs?

box_with_foldersCAN I DROP OFF COPY JOBS? The answer: Yes! Save wear and tear on school staff AND the school copier. Both teachers and administrators can drop off copy jobs or send them through interschool mail to the Graphics Lab. Turn around time ranges from a couple of hours to a few days, depending on quantity needed and on copy machine traffic . . . and sometimes can be finished by the time your meeting in the ASC building is over. 🙂 Please be sure that all copyright approvals are in place before you bring the job in.

Cost for copies is 4¢ per side – which includes white, pastel colors, and punched paper. Adding a pastel color cover to a stapled packet is no extra charge and makes a great impact!

Call Carol for a cost estimate or to find out what the turn around time will be on your particular copy job.

A Color Copier in the Graphics Lab!!!

The Graphics Lab has a Kyocera COLOR Copier that is here to stay. We have the best price in town with a charge of 15 cents per side for 8-1/2″ x 11″ Color Copies and 35 cents per side for 11″ x 17″ Color Copies . . . cash, check, or account number will be accepted for payment.

Here’s what the Color Copier can do:Kyocera color

  • copies photos or any full color image
  • enlarges & reduces
  • collates and staples
  • copies mixed originals (black or full color)
  • copies from the glass, directly from a flash drive, or when sent from my computer (i.e. an e-mail attachment)
  • paper size up to 11” x 17” (price 30¢ each)
  • copies onto photo stock or card stock (8¢ extra per sheet)

Personal items (like family photos or party invites) are OK to do – as long as they don’t break the          3 rules . . . nothing political, religious, or for personal gain (making money directly or through advertisement).  Now is your chance to gather up a bunch of stuff to color copy!

The Color Copier is only available for use when Carol is in the Graphics Lab.                     Questions? Call 827-3063.

Do you know who invented the scissors?

The invention of scissors is frequently attributed to Leonardo DaVinci (maybe Mona Lisa just needed her hair cut?), but scissors were around long before DaVinci’s time (1452-1519) and the actual person who invented scissors is not known.

spring scissors

In 1500 BC Ancient Egyptians used ‘spring scissors’ with two bronze blades connected at the handles by a thin, flexible strip of bronze – which served to hold the blades in alignment, to allow them to be squeezed together, and to pull them apart when released.

scissorsPivoted scissors or cross-blade scissors were invented around 100 AD by the Romans – made of bronze or iron, in which the blades were pivoted at a point between the tips and the handles. Large-scale production of this type of scissors began in 1761, when Robert Hinchliffe of Sheffield, England first used cast steel to manufacture them.

Scissors, X-Acto knives, and paper cutters are all readily available for your use in the Graphics Lab.

Laminating items wider than 25″

laminatorSo you want to laminate something that is wider than the 25″ laminator??  All you have to do is fold the item in half and run it through the laminator.  When you trim it right to the edges, the item will “pop apart”.  Then, if you want the back side laminated, you fold the item in half again – but with the previous laminate back-to-back.  When you trim right to the edges, the item will “pop apart” again!  For edges that don’t come apart, use an X-Acto knife and gently cut just the laminate (not the item).  Also, be careful trimming the folded edge – you could end up with a “fisheye” hole.

The only down side to this method is that you will have a permanent fold seam down the middle of your item, so you won’t want to do this with “good” posters – but for maps or parade banners this is a great solution!

If you are a “hands on” learner or need a project laminated like this, just drop by the Graphics Lab . . . both laminators are always on!

Hello world!

LEGO head smileI thought it would be fun to join the iBlog craze going on in Dearborn Schools! Please bear with me . . . even though this is the GRAPHICS Lab, I’m new at blogging. My intent is to share Graphics tips and tricks, as well as best use of equipment, to make your classroom and/or life run more smoothly! Also, I love facts, trivia, and history – so that may get sprinkled into the blog. If you have something you would like me to share, please send it along!

Carol Theisen, Graphics Specialist