Author Archives: zecharj

River Oaks: Drawings for Hospital Workers needed!

River Oaks: Drawings for Hospital Workers needed!

Our Preschool Teacher, Julie Bass, is asking for letters and drawings that can be shared with all of the doctors, nurses and hospital workers to show them how much we appreciate all of the ways they are doing their jobs and going way beyond that to help out at this difficult time. Maybe a letter, a note, a drawing, a picture, anything just to say THANKS!!!

The following is a portion of the email from Ms. Julie Bass:

Would you be able to include a lesson this week having your students create drawings of doctors/nurses/EMT/hospital staff, or write letters of encouragement, or thank you notes- something to recognize our appreciation for their bravery and commitment to taking care of us.  This could be adapted however you see fit to meet the needs of your grade/students/goals.  My PreK kids will hear a youtube story about doctors and I will ask them to draw a picture of their doctor and maybe finish a sentence stem- for those who are capable.  I am sure your kids could go a little farther than this.

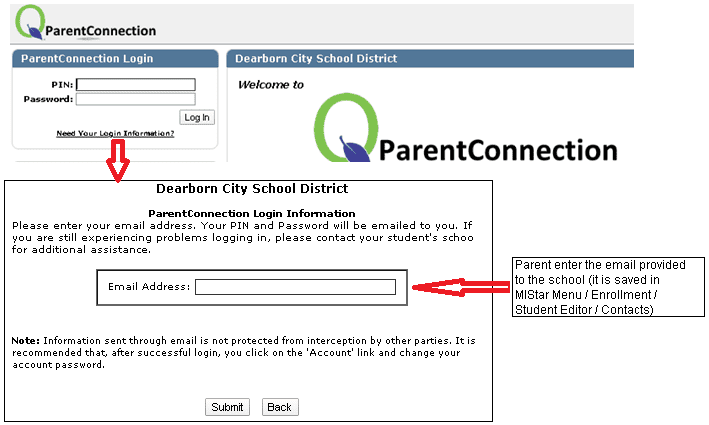
I am asking that students or parents take a photograph of their drawing/note and upload it to the google form (linked below).  I will share the file with contacts at local hospitals.  If you have any parents that work in the medical field please let me know.  I would be happy to share the file with them so that they can spread the River Oaks cheer with their colleagues in this hard time.
The google link is here:  https://forms.gle/9FBc9v6dnXAUa2Ez8

The deadline is Wednesday, April 22nd!!!!!!

An Illusion for the younger kids

An Illusion for the younger kids
East Urban Home 'Squares with Concentric Circles' Framed Oil Painting Print Size: 9" H x 12" W, Format: Black Framed
Circles!!!!!! And color!!!!!

All ages can make cool illusions. If the line ones seem too hard you could try this one using circles. It uses the idea of concentric shapes( the same shape but small, medium, large, larger sizes of it). You can uses any shape but we will do circles…

  1. Using a pencil divide your paper into sections. The example shows 12, but four or 6 will work. In each section draw a large circle. Inside that circle draw at least two more that get smaller and smaller.
  2. Now color! You should color each circle a different color in each box, or to try a harder illusion try two colors. If you try this -color every other circle the same kind of like a bulls eye.
  3. You can try this again making more sections so the shape starts out smaller and the paper is filled up OR you could try this with other shapes like squares, triangles, hearts, etc.

Have fun!!!!!

WELCOME BACK!

WELCOME BACK!

Hope everyone had a nice relaxing week without any school work. I also hope that you are well and that your families are, too! I am thinking a week of easy Optical Illusions could be fun!

This first one is pretty easy because…..you trace your hand! Make sure you trace the hand you DON’T write with OR you could ask someone to trace your hand for you. I like to put my hand to the top of the paper and add some arm, it makes the finished drawing look really cool.

After you trace your hand, draw lines from one side of the paper to the other BUT arch them slightly when you reach the lines that form the hand so that when the lines go through the hand they have a bit of a bump.

When you add color make sure that you make the bump inside the arm/hand/fingers with your color. You alternate every other section with color or do it like they do in the video.

I love illusions! They are fun to do and I like that they trick our eyes and mind to create something that really isn’t there!

Have fun with this and check back tomorrow for another optical illusion. As always- make sure you are doing your schoolwork, help out at home, get outside- but maybe not today- they are predicting a VERY windy day, and Be Kind!!!!!

Start collecting toilet paper and paper towel rolls, maybe some small boxes. I want to post some fun ideas using them in construction!!!

Parent Connect and Grades

Parent Connect and Grades

The Elementary Report Cards for Marking Period 3 are currently being processed and will be available to parents in ParentConnect, Monday April 6, 2020. Following is some information on how parents can access report cards data in MIStar ParentConnect. Please note that if you have more than one child, you should be able to see data for all your children and you do not need separate logins for the different schools (if your children attend more than one school).

How do parents login to ParentConnect? To login to ParentConnect, parents need their PIN and password; this is how it is obtained: Parents go to the Dearborn Schools’ website (dearbornschools.org) and then the ParentConnect link. If they don’t know the login info, they click the (Need Your Login Information) link and it will prompt them to enter their email address (as provided to the school and entered in MIStar), and then click Submit. This process emails them their PIN and Password. After logging in, click on the “report card marks” module.

If you need further assistance, please feel free to reach out.

Hope you are staying safe and healthy.

Love your neighborhood….

Love your neighborhood….
Rainbow & Cloud Garland Rainbow Birthday Party Pride Over image 0

Want to do something to hang in your window so that neighbors walking or riding their bikes can see? I’ve been seeing a lot of windows in my neighborhood and on the internet with cool drawings and I was thinking of something we could do….How about this?

If you don’t have colored paper, you could cut out the hearts and color them in with marker or crayon.

I think I might hang the one I made outside in nice weather, then put it in my window so people going by on their walks can see that I am thinking about them.

Send pictures if you do it!

This is from the Dearborn City Government Instagram: another GREAT idea!

Please stay safe and be well! No school work next week since it is our break, but I will see you right back here on April 13!

Hope the bunny leaves you some goodies, as always- help out around the house and Be Kind!

Friday! Hi, Everyone!

Friday! Hi, Everyone!

Well, we made it through another week together! Yay! I have a drawing and coloring activity that has to do with Easter. You can make the rabbit and then color some of the pages if you want something else to do. I like to color so I have included several for you to choose from.

A short instructional video…..
Easter Bunny Template
Easter Bunny Craft Activity
Student examples………………..
  1. Trace the outline of the bunny with a black marker.
  2. Choose either straight lines in each section or different patterns. I would suggest lead pencil first and then when the artist is happy, they can go over their lines with a black marker.
  3. Then, color in the bunny’s sunglasses. The brighter the better!
  4. Cut out the sunglasses and each section of the bunny – 2 ears, 4 head parts, and the body.
  5. Glue each section of the bunny onto colored card so that you can see a gap between each section.
  6. Then, glue the sunglasses over the top.

Hang them up for some bright and colorful decorations, I promise they will make you smile!

Anti Coloring Book Printables Elegant Anti Stress Coloring Pages for Girls to and Print
Printable Easter Egg Coloring Pages - Free Coloring Sheets
Easter Egg Coloring Page Easter Egg Printable Coloring Page Ooly
Easter printables: Easter egg mural printable | Jan Brett

Okay, that should do it! Color, color, color! As always, do your schoolwork, get outside in this BEAUTIFUL weather, help around the house and Be Kind!!!!

Well, we are back to THURSDAY!!!!! And SUNSHINE!

Well, we are back to THURSDAY!!!!! And SUNSHINE!

It has been warming up outside, hope you are getting out for a bike ride, a walk or to play in the yard. I am riding my bike everyday and I am enjoying the spring growth popping up in my flower beds. Saw a few flowers and that makes me happy!

I was thinking it might be cool to draw a map. It could be of the inside of your house, your neighborhood, OR you could really work your brain and draw a map of the inside of our school. We haven’t been there for awhile so it might be hard to remember the order of the rooms, but it could be fun to try!

If you watched the video you got to enjoy a reading of a book that shows all different maps. Maybe that could be inspiration! You could make a few maps, some that are real and that are of places that you know, and maybe one about a favorite place you went on vacation and maybe even one about outer space or some made up place that you create from your imagination!

Don’t forget to add symbols, a compass rose and lots of color. Here are a few symbol examples if you make one of the neighborhood or city, but you can make up your own, too!

Map Symbols anchor chart: Social Studies unit for Kindergarten
Ideas BUT you can make your own, too!
Vehicles & Transport
A crazy, full map!
Cursum Perficio | The Series: Part II, The Inside of the House - The Marilyn Monroe Collection
Fancy house and yard!!

Well, you get the idea. Have some fun with this!

As always, miss you! Please do your schoolwork, get outside, help around the house and Be Kind!!

Wednesday……It’s APRIL 1st: April Fool’s Day!!!!

Wednesday……It’s APRIL 1st: April Fool’s Day!!!!

Morning to EVERYONE! Hope you are all well and ready for some art fun…..

If you have watercolor paint, you could paint a grass scene, if not- crayon and/or marker will do! Make a sheet that looks like it could be grass- different shades of greens, you could add some insects or flowers to give it more dimension, but think- when you weave your snakes through, you MIGHT not see the detail you put in the grass.
From another sheet of paper cut some snakes. They could be just rectangles or you could trim them so that you can see a head and a wavy or slithery body. Make sure the snakes are slightly longer than your grass paper.
Decorate the snacks- you can cut and glue on designs from cut paper or add designs with crayons and markers. Give them patterns so they look cool when you weave them in!
Now take the grass paper and make and UNEVEN number of cuts that start at the top but STOP before you get all the way to the bottom. You want the bottom of the paper in ONE PIECE!
Now for the best part. Take one snake and start to weave it in- over, under, over, under until you have taken it across the whole grass paper. Your next snake is woven the opposite of the one before, so start under, then over and so on until you reach the end. Every other snake will be woven the same. Cut the top of the left over grass to make it look spiky! And there you have it, snakes in the grass!!!!

A fun and color thing to do. Hang it up in your room or share it with your families, bright colors make everyone happy!

Hope you and your family are doing well. Please do your schoolwork, get outside everyday for a bit of fresh air, help out around the house and Be Kind! Miss you all!!!!