Hi! Ready to move on with the comic strip? The download is a simple sheet of boxes that will help us move our story along. Print off a few so once you get on a roll you can just keep going. Use the first square as your title box. So write the name of the comic in there and your”by” line which means by you.
You can see the title and the by line and an image in the first box.
Right now we are just setting up the boxes with the story you came up with yesterday so don’t add too much detail to drawings- you really could just write the text- conversation or the action taking place- at the top and then write about the image in the bottom of the box. This is called a story board. We want to save all of our great drawing and detail for the final copy.
Story board example…….
Well- get your storyboard together- one scene in each box! Check back tomorrow for the next step!
As always- do ALL of your schoolwork, get outside for fresh air, help out around the house and Be Kind!
Hello, everyone! Hope the beginning of the week finds you and your family well and ready for a Back to School Week!
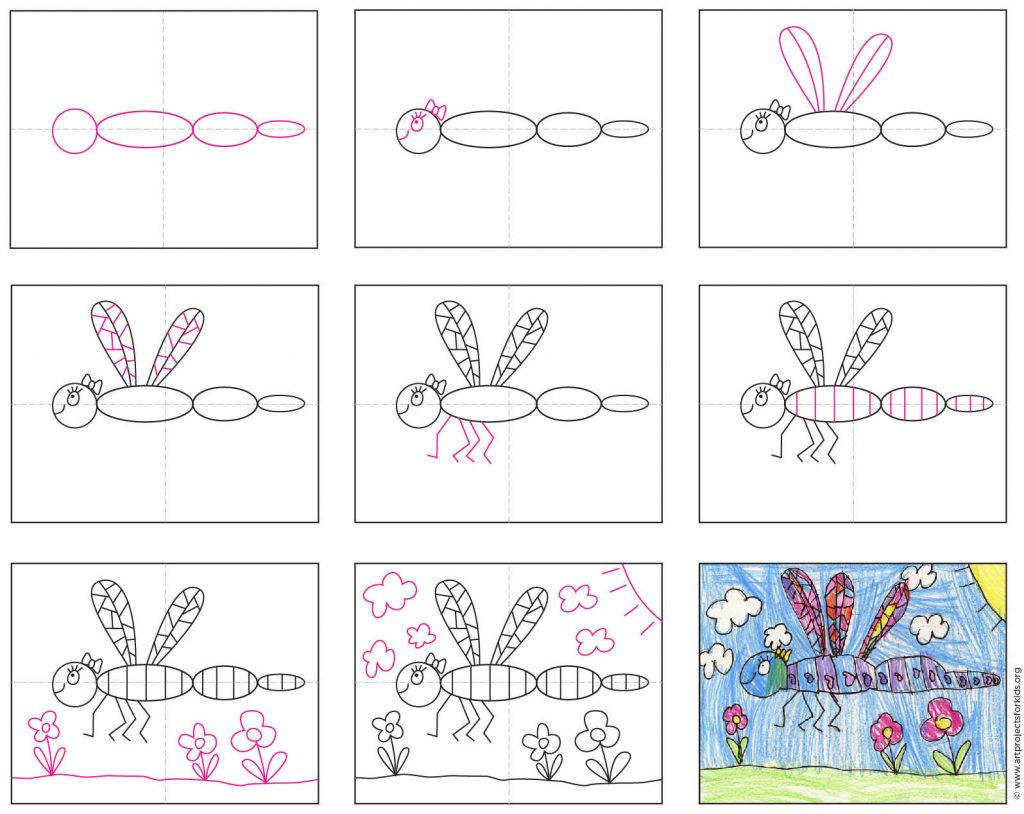
For the little guys……how about drawing a dragonfly? Follow the step by step instructions and then color it in to look really fabulous!
Post your beautiful art in the window so that people walking and riding by can see how creative you are!!!
For the bigger guys…..let’s start a comic strip today that we can work on all week and turn into a comic book by the end of the week!
So, let’s start with this worksheet. We can make a really quick one to get the hang of it by filling in the information on the sheet. Instead of showing it to friends, maybe share it with someone in your family. Once you have this one knocked off, turn the paper over and do the following:
1. Come up with a story line that could get long enough to make a comic book. Write the story down or use a list of events that will happen starting at 1. and working your way through the action. Be thinking about the characters and how they interact and move the story along.
2. Draw a character sketch of each of the people/animals/aliens/monsters, etc. that will be in you story. Think about detail and making them interesting to look at. Color them in if you want of you could leave them just black and white for now.
Let’s stop there for today. Make sure you have an interesting story- something that moves along, it can be funny, serious, you could tell jokes, …think about what the characters will be doing and we will pick it up tomorrow! Come up with your OWN story and make up your OWN characters. Don’t copy anything, be creative and take ownership of this!!!
As always- do all of your schoolwork- we start grading this week! Get outside for some fresh air, be helpful at home and Be Kind!!!
Well, we made it through another week together but apart…..!!!
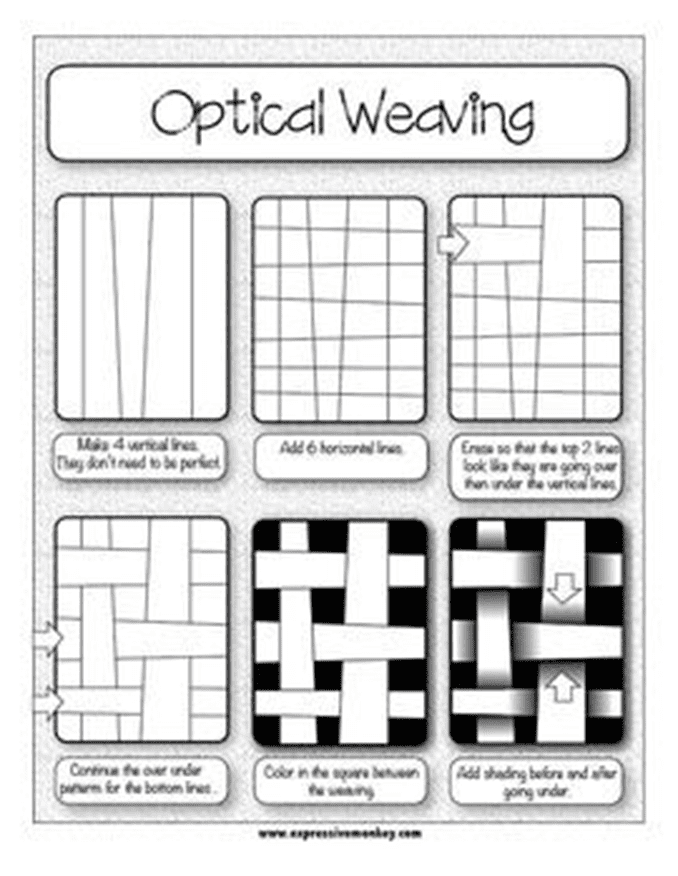
A last set of illusions- they will take some time to do so they are great for some weekend entertainment, too! The first one is called the weave…..
The directions are blurry so 1. Draw four vertical lines. 2. Draw 6 horizontal lines. 3. Erase so that the top two lines look like they are going over THEN under the vertical lines. 4. Continue with the over and under pattern to the bottom of the paper. 5. Color around the woven lines you created. 6. You can add some shading if you want. Can you believe you made this illusion on flat paper just by drawing and erasing? Pretty cool!!!!!
Last One- the bulging heart! You could do other shapes, too, like geometric or organic! Have fun with colors!!!! Next week we move on, maybe we will make a comic strip and turn it into a comic book…hmmmmm
As always- do all of your schoolwork- next week we start grading your work again!!!!! Get outside for fresh air, help out around the house and Be Kind!!!
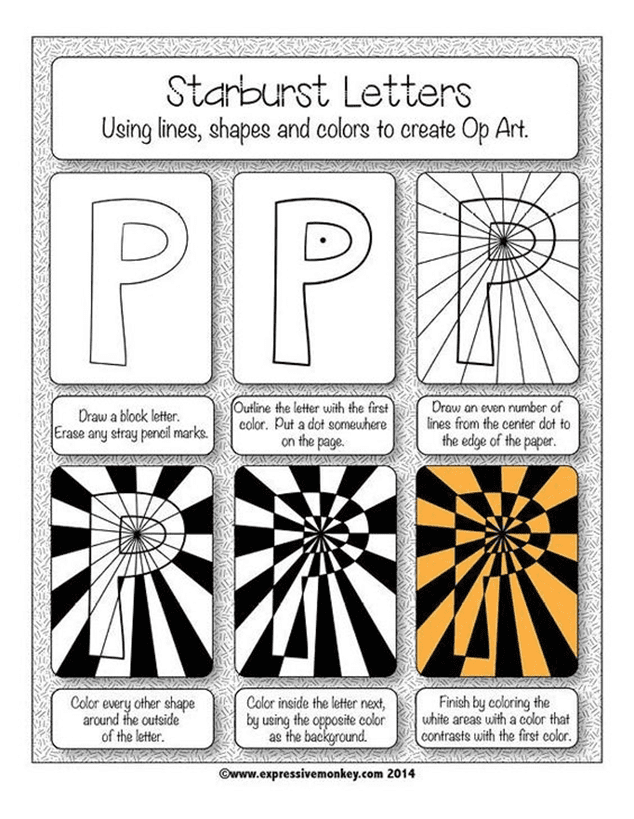
Hi, everyone! Illusions, illusions….another one today. This time you will use an initial or a letter, or it could be a shape- your choice!
You could do one for each letter in your name and make a banner……
Hope you are keeping busy and that you and your family are well. Please do all of your schoolwork, get outside if possible, be helpful around the house and Be Kind!!!!!
Hello! Here is a video that has A LOT of fun little animals and insects that you can make out of paper. They all use simple shapes that we know how to make. You need paper and scissors and glue….if you don’t have colored paper, that is okay, you can add your own color with crayons or markers. If you don’t have toilet paper tubes you can roll a cylinder- the same shape- out of paper! Be inventive and use your problem solving skills!
I hope you have some fun- there are a bunch of things to make! Here are just three examples. Post some pictures is you want to share with me. I would love to see what you make!
Snails
Ladybugs……Birds……
Please make sure you are doing your schoolwork, try to get outside for a little bit each day, help around the house and Be Kind!!!!!
Hope you are well and that you have been having fun with the idea of optical illusions. Today our illusion piggy backs on to what we did yesterday! It is just more intense and these can be super cool if you make the lines close together and maybe vary the distance in between. This time you don’t have to worry about matching up the lines in the sections.
Very cool, right????
The sky is the limit! Have fun!! Share your artwork with me if you can or want to! As always- do all of your schoolwork, get outside for some fresh air, be helpful at home and Be Kind!!!!
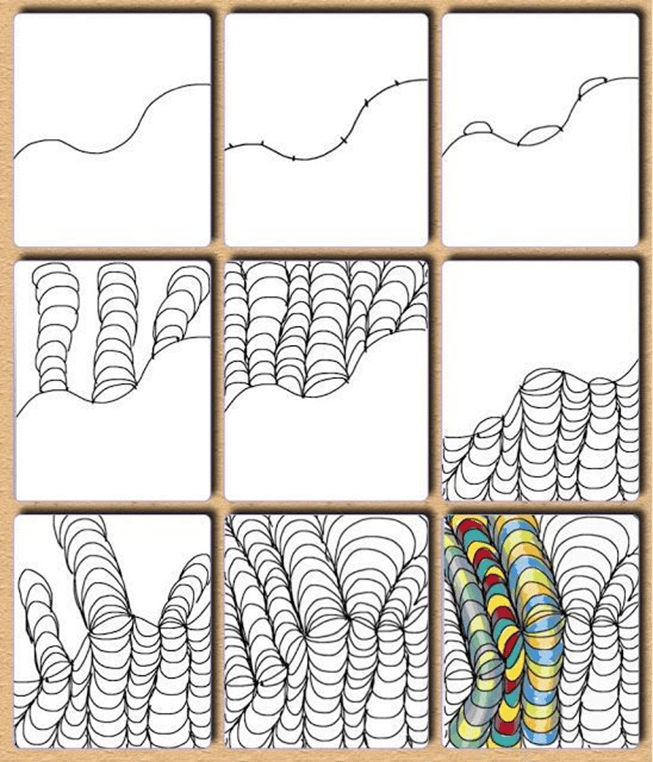
The WAVE!!! The directions are hard to read and I think you can see the steps in each picture, but I will direct you through them.
Draw three lines that all slant toward the bottom of your paper. Make sure they are slanting toward the middle. You want to make them farther apart at the top of the paper to get the full illusion effect.
In the middle section only – draw lines that have a bump or arch that goes up. Make them about the same distance apart from each other.
In each of the side portions you need to start a line from the center and go to the outside of the paper BUT this time you need to have a dip or an inverted arch. The lines need to connect so that the illusion of a wave in fabric, ribbon or a flag are easy to see.
Pick ONE color to start with. Start in the middle portion and color in every other section.
Now this can get tricky….In the side area you color in every other section BUT you do the opposite so that it looks live it is flapping or waving in the wind. So…if the bottom row is colored in in the middle section, the bottom row on the right and left IS NOT colored in. You can see the example, it is easier to look at then to explain.
You can leave it the way it is or you can add a second color!
It shows that you can shade the sections to make it look more realistic but that is up to you because we created the illusion called The Wave!
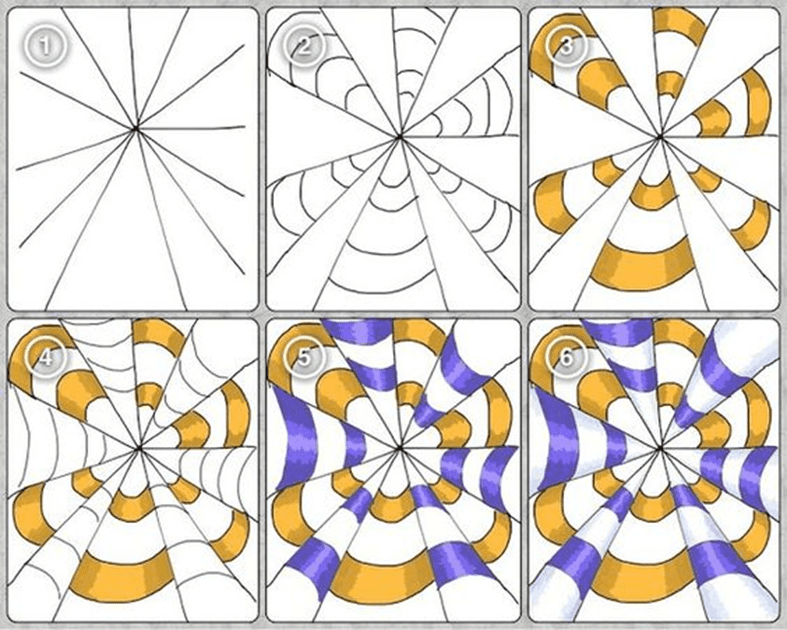
You can make a lot of these using different colors AND you can make them more interesting if you add more slanted lines so the spaces are smaller, but if you did it right it made a really cook illusion or trick of the eye! If you are interested you could also try this one. The idea is the same but it uses a focal point in the center.
For this one you need to make a dot near the center of the paper. Then, starting at the dot, draw an even number of lines from it to the side of the paper. The example uses 12 lines.
Next- in every OTHER section draw lines that dip down. The sections you made will get thinner as they get closer to the center.
Pick one color and color in EVERY other line or portion. Do this in each of the sections that you put lines in. This should be every other section, with a blank section in between.
Now add bumped or arched lines in each of the blank sections- remember to make them start and end at the lines on either side so they look like they are flowing.
You can add a second color in the areas shown
You could add another color in the white areas or leave it the way it is.
Two fun illusions- they seem hard at first but are very cool when finished. If you get frustrated take a break and come back to it! Hang in there because you will feel a great sense of accomplishment when you finish.
Another illusion tomorrow! As always- do all of your schoolwork, get some fresh air, be helpful at home and Be Kind!
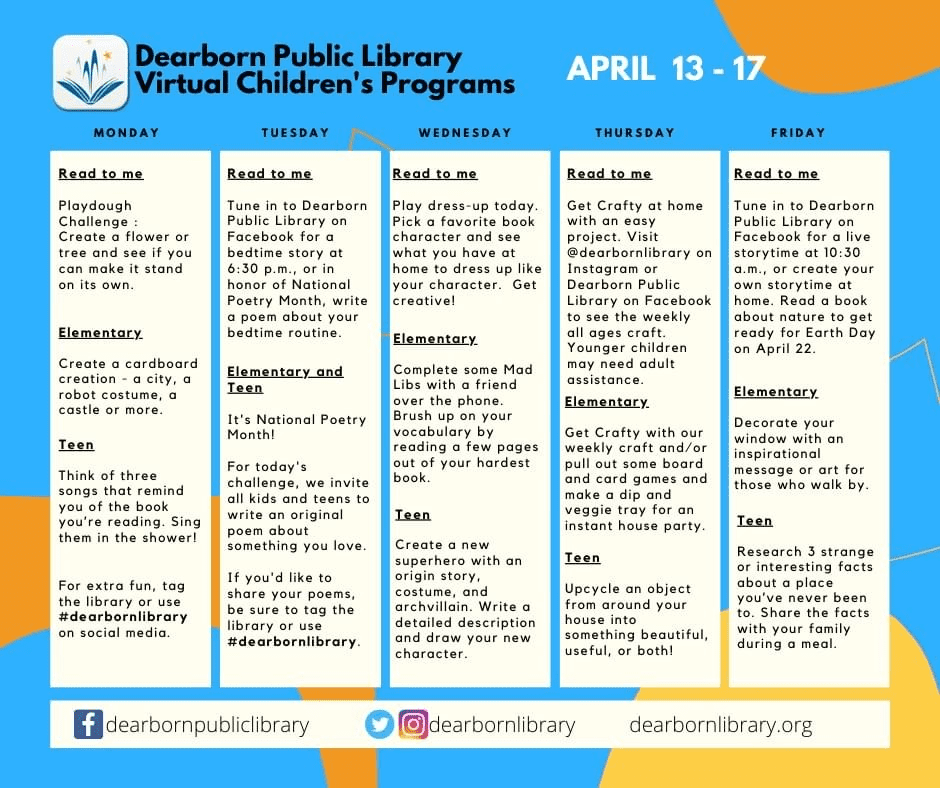
Our Dearborn Public Library is offering interesting programs every day this week. Check it out and see if there is something you might want to be a part of!