
The WAVE!!! The directions are hard to read and I think you can see the steps in each picture, but I will direct you through them.
- Draw three lines that all slant toward the bottom of your paper. Make sure they are slanting toward the middle. You want to make them farther apart at the top of the paper to get the full illusion effect.
- In the middle section only – draw lines that have a bump or arch that goes up. Make them about the same distance apart from each other.
- In each of the side portions you need to start a line from the center and go to the outside of the paper BUT this time you need to have a dip or an inverted arch. The lines need to connect so that the illusion of a wave in fabric, ribbon or a flag are easy to see.
- Pick ONE color to start with. Start in the middle portion and color in every other section.
- Now this can get tricky….In the side area you color in every other section BUT you do the opposite so that it looks live it is flapping or waving in the wind. So…if the bottom row is colored in in the middle section, the bottom row on the right and left IS NOT colored in. You can see the example, it is easier to look at then to explain.
- You can leave it the way it is or you can add a second color!
- It shows that you can shade the sections to make it look more realistic but that is up to you because we created the illusion called The Wave!
You can make a lot of these using different colors AND you can make them more interesting if you add more slanted lines so the spaces are smaller, but if you did it right it made a really cook illusion or trick of the eye! If you are interested you could also try this one. The idea is the same but it uses a focal point in the center.
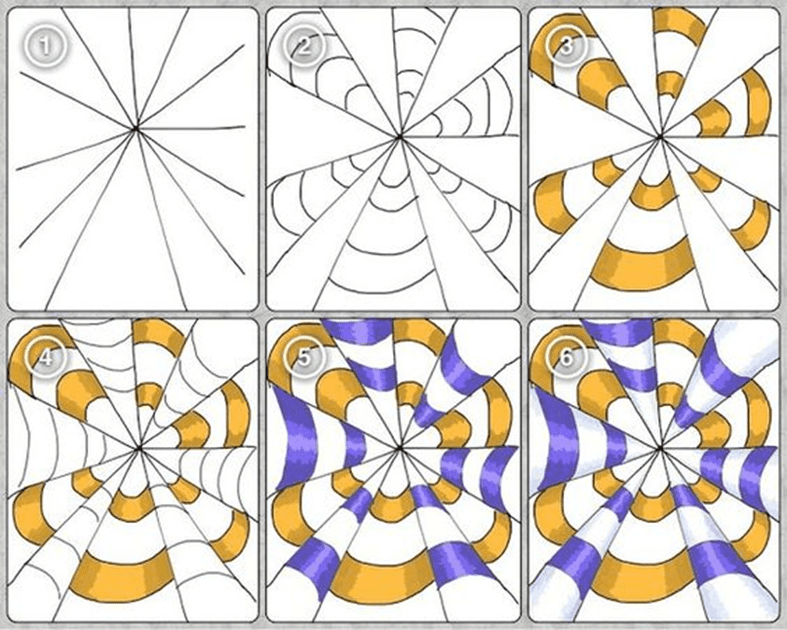
- For this one you need to make a dot near the center of the paper. Then, starting at the dot, draw an even number of lines from it to the side of the paper. The example uses 12 lines.
- Next- in every OTHER section draw lines that dip down. The sections you made will get thinner as they get closer to the center.
- Pick one color and color in EVERY other line or portion. Do this in each of the sections that you put lines in. This should be every other section, with a blank section in between.
- Now add bumped or arched lines in each of the blank sections- remember to make them start and end at the lines on either side so they look like they are flowing.
- You can add a second color in the areas shown
- You could add another color in the white areas or leave it the way it is.
Two fun illusions- they seem hard at first but are very cool when finished. If you get frustrated take a break and come back to it! Hang in there because you will feel a great sense of accomplishment when you finish.
Another illusion tomorrow! As always- do all of your schoolwork, get some fresh air, be helpful at home and Be Kind!