REMOTE ASSIGNMENT #5: STATEMENT PAPER RING W/ SELF-CRITIQUE / REFLECTION
(HAND IN VIA iLEARN)
You can access the assignment by either downloading it via the Download link located below, reading it below, OR by going to the iLearn course you belong to under “Remote Learning Assignments”.
Objective: Students will learn how to make a ring out of paper and glue
Supplies Needed:
- Some type of glue (For example, Mod Podge, Elmer’s, or a glue stick etc.) (If you do not have glue, then make your own! You can find the recipe at the end of this handout, posted in this assignment in iLearn, and in my FHS Jewelry iBlog)
- Paintbrush (you don’t have to have a paintbrush, but it helps keep your hands clean) or at least something you can use to apply the glue evenly, like a glue spreader or a flat frosting knife (ask first before using).
- Scissors
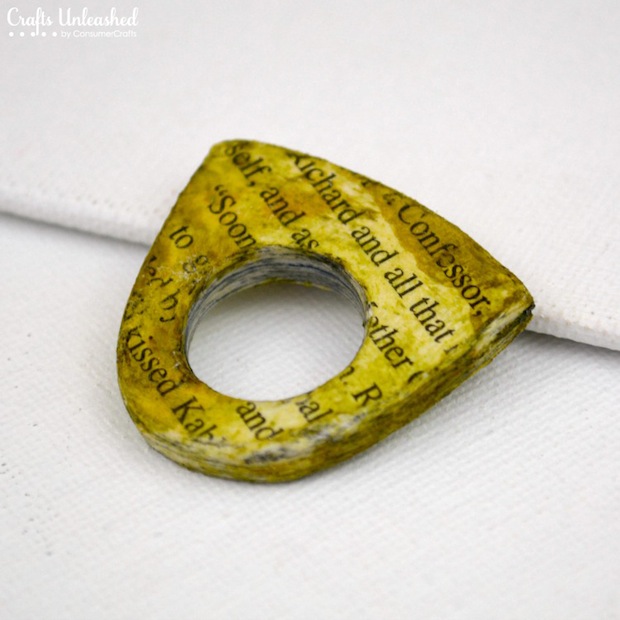
- Paper, newspaper/flyers, or thin cardboard (For example, cardboard from a 12 pack of canned soft drink, cereal boxes, cracker boxes, paper bags, scrapbook paper, book pages, newspaper, flyers, etc.).
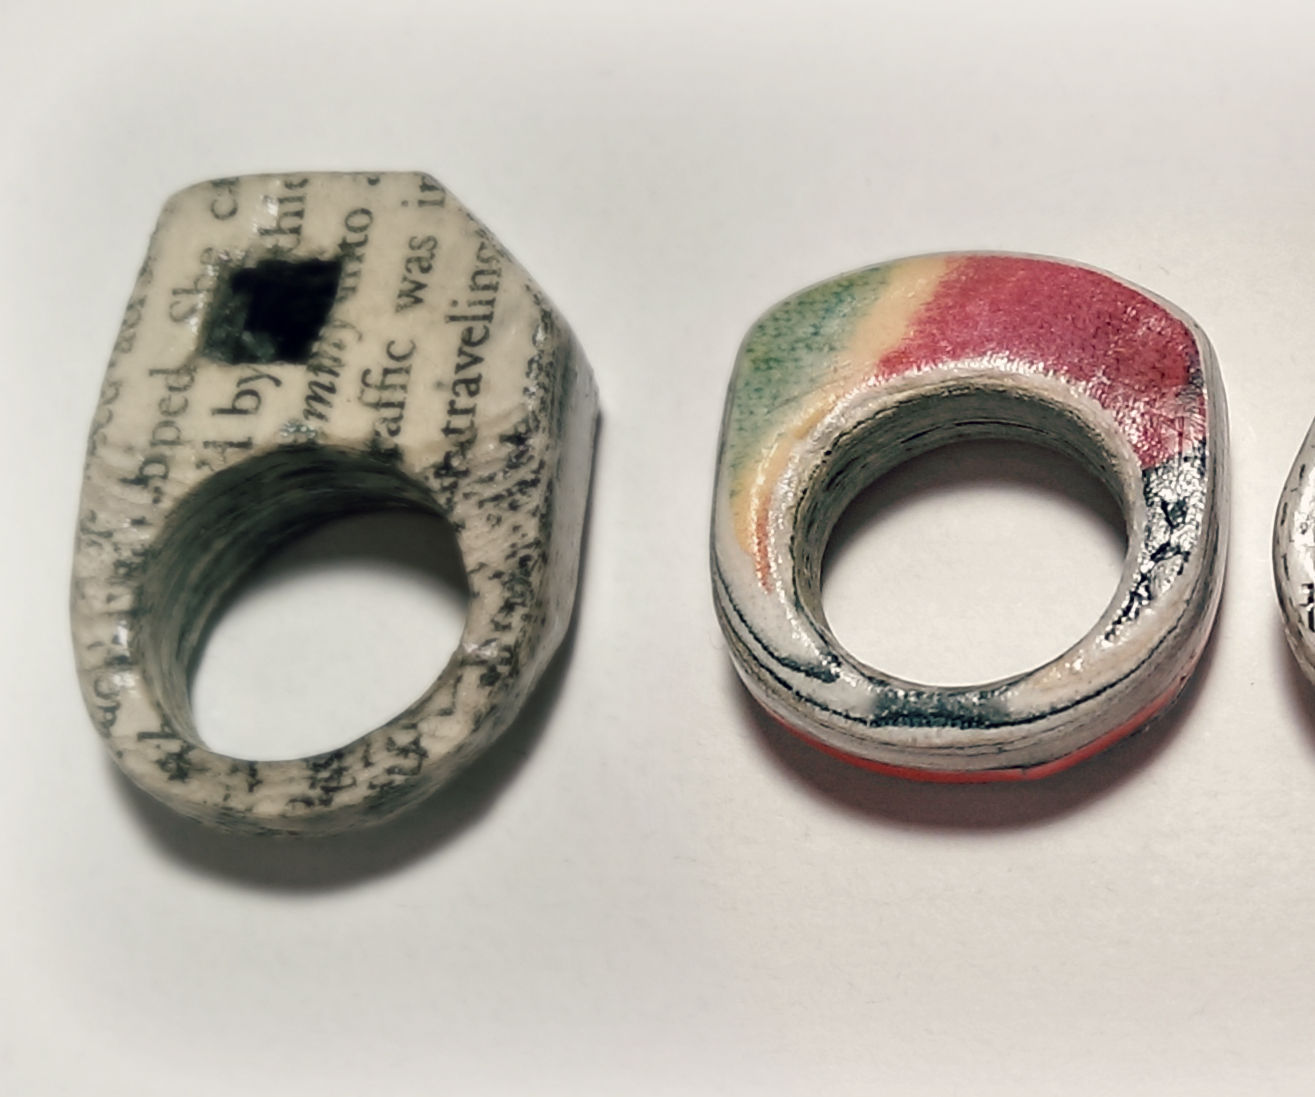
- NOTE #1: I suggest that you use paper that is already colored or has some type of print/design on it. Another idea is that you can glue all the layers together in one type of paper that might be plain, but you have a lot of it…then put the paper that has a design/print/is already colored just on the top layer.
- NOTE #2: Just remember the thinner the paper, the more you have to cut out and glue. This does not mean you go find the thickest cardboard and cut it out without having to glue it to anything else. Gluing the paper together is part of the technique and is required for this assignment. I will require you to take pictures of the ring from all sides and have you include some close-ups so that I may see if you have followed my directions. Failure to follow the instructions will result in a zero on the assignment, even if you made and submitted a ring.
- Sandpaper (optional)

Cut out a shape for your ring that you like. You can make adjustments and “try it on” while you find a shape, size, and style that suits you best. You will want the bottom and sides to be about 1/8 inch thick. The top can be anything you like!
Once you’ve settled on your shape and style – cut lots of them!
Newspapers are thin; I actually just folded a piece into eights, traced the shape onto the outer fold, and cut 8 at a time. I used 5 pieces – making this ring 40 layers. If you are using scrapbook paper you will likely need about 20-30 layers, and one 12×12 sheet should be sufficient! If you are using thin cardboard, it will take around 10 layers etc.

Next, you will stick all the layers together with Glue. This is actually very much like paper mache – you are cementing layers of paper to create a durable medium. Just brush on a thin coat, add another layer, and add another coat. Repeat until you’ve gotten the thickness you like. Line up the layers as well as you can. If you have sandpaper, you can sand down the rough edges at the end, but that step will go more quickly if they are already pretty well lined up – especially the center hole. Allow your ring to dry overnight.
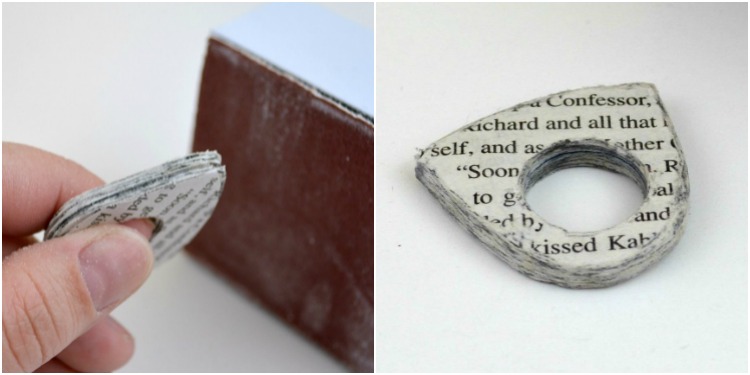
The next day, sand the rough edges, if you have sandpaper. You can even use scissors to trim areas that are uneven/messy. Be sure to even up the inside hole – that should be as smooth as possible since it will be next to your skin. This is also your opportunity to increase your hole size, if necessary. If you’re happy with your ring, you can quit here! Just give it one more good coat of glue after sanding and allow it to dry for a few hours.

PAPER STATEMENT RING RUBRIC
- One Paper Statement Ring documented with multiple close-up pictures of the ring from every side. Take pictures of your ring from the top looking down (thin), turn it upside down and photograph the bottom facing up / you looking down, turn it to the front (wide side), the back (wide side), the left side (thin), and the right side (thin) getting every side/angle you can. Do not throw your ring down on the counter, take a picture from far away with terrible lighting, and hand it in. Think of it as a photo shoot for a product that you are going to sell online.
Sell me that ring / earn that grade.
- A Self-Critique/Reflection that is at least one paragraph. This means 5 to 7 sentences.
T0TAL AMOUNT OF POINTS AVAILABLE FOR THIS ASSIGNMENT: 4

++++++++++++++++++++++++++++++++++++++++++++++++++++++++++++++++
WHEATPASTE
Wheatpaste is a very simple glue that will cost you under a buck a gallon to make. It is just flour and water. The recommended ratio of flour to water is 1:4, for example, one cup flour and four cups water.
Basic Wheatpaste Recipe (Stove top)
- Combine 1 part flour to 4 parts water in a large saucepan
- Whisk constantly to prevent chunks from forming
- Heat to just below a boil, until it has reached the desired consistency.
The glue can be used immediately. If you plan to use your glue when it has cooled, make sure to make it a little thinner, because it will thicken up. This glue should be used quickly, because it will start to smell after a couple of days.
Basic Wheatpaste Recipe (Microwave)
- Use 1 part flour with 4 parts water in a glass Mason jar or any other microwave-safe container. I would suggest using a paper towel to cover the opening, just in case…
- Microwave for a minute at a time until it reaches the right consistency
- Whisk the mixture very well in between minutes to prevent chunkiness.
NOTE: Once the glue gets ever so slightly thicker, microwave for less than 30 seconds at a time, because the glue thickens exponentially fast.
(CLICK ON THE PAGES BELOW TO ACCESS THE REST OF THE REMOTE ASSIGNMENTS…)